
5 Steps for Sanding a Door
Contents
– Step 1: Prepare the door before sanding
– Step 2: Protect yourself and prepare your environment
– Step 3: Case 1: Sanding the door manually
– Step 3: Case 2: Sanding the door with an electric sander
– Step 4: Sand the hard-to-reach areas of the door
– Step 5: Do the finishing touches
Sanding a door allows you to remove its varnish or paint before applying another finish.
Two types of sanding are possible: manual sanding with a sanding block and electric sanders such as a belt sander and an angle sander (triangular, corner).
This sanding is done first with medium-grit sandpaper and then with a fine-grit sandpaper.
Here are the steps and equipment for sanding a door.
Warning: sanding paint containing lead can be very dangerous for your health. Lead paint has been banned since 1948. If your house is older, call a professional who will carry out a diagnosis of your paint. This diagnosis is part of the mandatory real estate sale or rental diagnosis.
1. Prepare the door before sanding it

First of all, clear the door. To do this, push the door up and down while holding the handle. Place the door on a pair of trestles.
Remove the handle from the door: unscrew and place the screws in a jar to find them easily once the door has been renovated.
Next, check your door for cracks or holes caused by weathering or wear. If there are, you’ll need to fill them in with wood filler.
To do this:
– Lay some wood putty over the cracks or holes to fill them.
– Smooth the wood putty with a coating knife and let it dry for 24 hours.
Note: Wood putty is sold ready to use in tubes or jars.
2. Protect yourself and prepare your environment

– If sanding indoors, protect the furniture with tarps, polyethylene film, or used sheets.
– Close all doors in the room where you are working to prevent dust from entering other rooms.
– Caulk the groove between the door and the floor of each door with used towels or a rag.
– Work with the windows open and protect yourself with a mask to avoid inhaling sanding dust and protective glasses and gloves.
Case 1: Sanding the door manually

To sand your door manually:
– Attach your sanding paper to the sanding block. In most cases, these shims are self-gripping and allow a simple and fast fixing of the sanding paper.
– Sand one side of the door and the thickness of the door with regular and soft strokes.
– Always sand the wooden door in the direction of the grain to avoid splintering.
– Turn the door over and sand the second side similarly.
– Then, sand your door with fine sandpaper. To the touch, your table should not have any roughness.
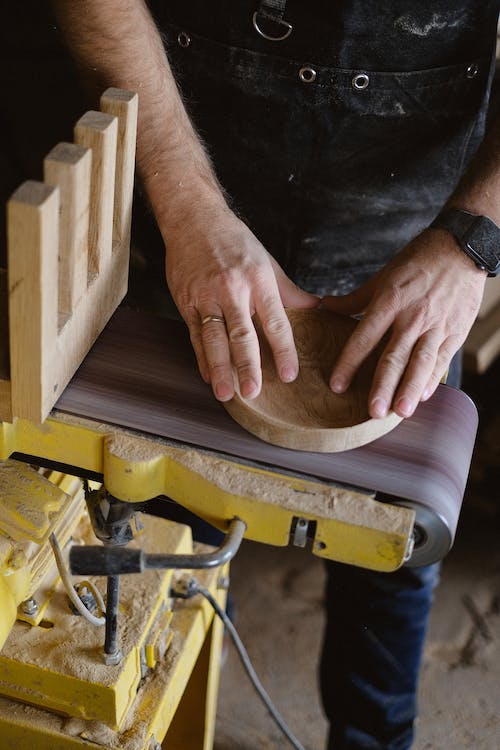
Case 2: Sanding the door with an electric sander

Use an electric disc sander to save time on a surface like a door.
Connect the sander’s plug to a 5 or 10-m extension cord to move quickly around your door while sanding.
– Fit the belt or sheet of medium grit sandpaper to the disc sander.
– Sand the entire door, following the direction of the wood grain (if your door is made of this material).
– Then, fit the belt or fine-grit sheet to the same sander.
– Sand your piece of wood again.
– The wood should feel smooth to the touch.
– If the door has a few rough spots, sand it again.
Caution: do not stay too long in the same spot; you risk marking the wood by digging it.
4. Sanding hard-to-reach areas of the door
If you want to sand a hard-to-reach area with a belt sander, use an angle (or triangular) sander.
– Attach a triangle of medium grit sandpaper to the triangular sander shoe (it should be the same size as the sander shoe).
– Sand any hard-to-reach areas.
– Then, change the medium-grit sandpaper to fine-grit sandpaper.
– Re-sand the hard-to-reach areas of the door.
– Check that you have sanded the door correctly. To do this, run your hand over the door. If your door has any rough spots, remove them by resanding.
Caution: Do not stay too long on one spot when sanding; you risk marking the wood by digging into it.
Finish the door
Once you have finished sanding the door, vacuum the entire door to remove most of the wood dust.
Then wipe the whole sanded door with a damp cloth to remove the last dust.
Now you can apply the chosen coating to the door.
Equipment for sanding a door
Vacuum cleaner
Tarp
Jar with lid
Sanding block
Cloth
Coating knife
Gloves, goggles, and mask
Sanding paper
Wood paste
Disc sander
Electric extension cord
Towel
Phillips screwdriver
Trestles