How to Sew an Appliqué
Contents
Sewing an appliqué
Step 1: Prepare your appliqué before sewing
Step 2: Select the right stitch to sew the appliqué
Step 3: Use the right accessories
Step 4: Stitch the appliqué to the fabric
Step 5: Manage the corners of your appliqué
Sewing an appliqué
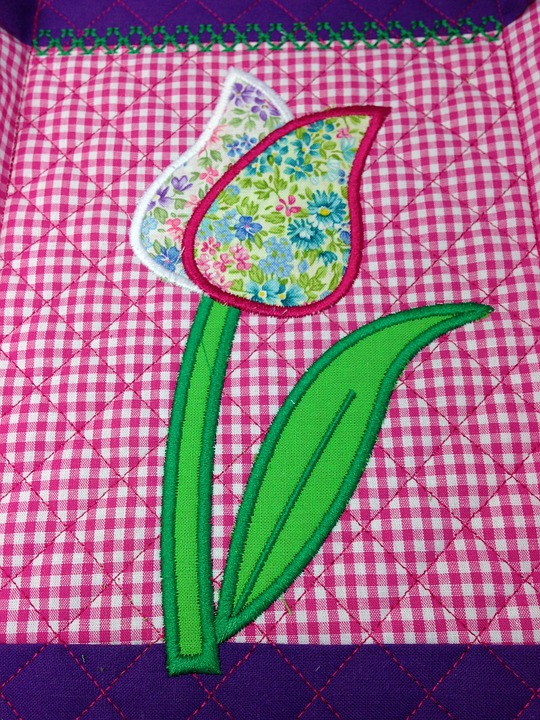
A towel to decorate, a cushion to personalize, or pants to patch? Sewing an appliqué involves sewing cut-out fabric shapes onto a work. And if it requires more patience than mastery, sewing an appliqué can become an art, even to the point of creating fabric paintings!
The method of appliqué is simple: one or more pieces of fabric are cut, ironed, and then machine sewn onto another fabric. It can be a garment, a bag, a tea towel, a bib, or any other textile to decorate. You can also use applique to cover up stains or snags.
If you’re starting, stock up on patience: sewing an appliqué takes practice and practice. The key word? Take your time! A good result is a matter of meticulousness, not speed.
Note: Choose a double-sided iron-on specially designed for appliqués, such as Vliesofix®: it allows you to stick the design to the destination fabric, so it won’t move when sewn.
1. Prepare your appliqué before sewing
First, choose a design. Start with basic shapes without sharp corners, such as circles. If you run out of inspiration, transfer the patterns from children’s coloring books, which are ideally suited to appliqué. With practice, you will be able to vary the shapes, thread colors, and fabric patterns…
Once you have chosen the shape of the appliqué, print it or draw it on a sheet of paper.
Be careful: if your design has a meaning, such as a word, you need to print or draw it upside down.
Cut a piece of iron-on that is larger than your design. Place it on top of your design with the matte side of the iron-on facing you. Offset the design with a pen or pencil.
Apply the glossy side of the iron-on to the back of the fabric you are cutting out. Pin if necessary, and place on ironing board.
Place the iron on the fabric for about 10 seconds without steam.
Once the fabric has cooled, cut out the design, following the pencil line on the iron-on.
Remove the film protecting the second sticky side of the iron-on.
Place the iron-on design in the desired location on the appliqué fabric.
Iron on as before.
Note: You can also use a design already cut out of cardstock. In this case, iron a piece of fabric larger than the design, place the template on it and trace the outline with a pencil before cutting.
2. Select the right stitch to sew the appliqué
Sewing an appliqué is usually done with the bourdon stitch, a very tight zigzag stitch. This is included in the decorative stitches of some machines.
If yours doesn’t, use a zigzag stitch, reducing the spacing and width: ideally 0.6 mm spacing and 2 mm width. You can also use the buttonhole stitch.
In all cases, the setting is personal, and the width of the stitch must be adapted to the size of the appliqué to be sewn. Try it out!
3. Use the right accessories
If your sewing machine has a bourdon stitch, it may also have a special foot, in which case use it. If not, adjust the presser foot to the fabric to pull the stockinette properly.
To sew an appliqué without blocking, use a needle adapted to the fabric: leather if you are stitching leather, jersey for jersey, denim for denim… standard for others! Be careful with the thickness of the fabric: if you feel the needle blocking, choose the size above.
Choose a classic, solid thread in the color of your choice. You can also use canned embroidery thread.
4. Stitch the appliqué to the fabric
Stick the needle into the fabric, preferably at the start of a straight line, and as far as the width of the zigzag inside the design: to be strong, the zigzag stitch must bite through the appliqué.
Stitch along the pattern. There’s no need to go too fast, and there’s no reason why you can’t go stitch by stitch!
The direction of the zigzag should always be perpendicular to the edge of the appliqué, and the zigzag should not be at an angle: to do this, the presser foot should be parallel to the edge.
5. Manage the corners of your appliqué
When you reach a corner:
Stop sewing. Turn the sewing machine handwheel, so the needle stays in the fabric but outside the appliqué to avoid a hole between the stitches. Never lift the presser foot without the needle in the fabric.
Raise the presser foot. Turn the fabric to position it in the new direction, lower the presser foot and resume stitching.
Turn slightly, then stitch two stitches. Turn again, and so on until you have passed the corner, keeping a dense and regular stitch. Be careful not to turn the fabric to the right angle before starting again, and you would have a hole in the stitch in any case.
Finish with a back stitch, then cut the threads short. You’re done!
Sew a complex appliqué
If you’re looking to create an entire design with multiple colors or patterns, do the same: decal, heat seal, and cut out each piece of fabric. Then:
- Glue all the pieces to the fabric intended for the appliqué. By stitching them together, you will avoid unnecessary seam allowances.
- Start by stitching the individual pieces, then the ones underneath. Continue this process until you finish with the pieces that are furthest above.
- Adjust the size of the stitch to the complexity of the design: the smaller and more numerous the pieces of the appliqué, the denser and narrower the zigzag should be.
Materials needed to sew an appliqué
Dressmaker’s scissors
Pencil
Iron
Sewing thread
Sewing machine
Fabric